Something I’ve been waiting to post for a while, because it’s a piece that is easily one of my favourites despite its’ simplicity and well aged design.
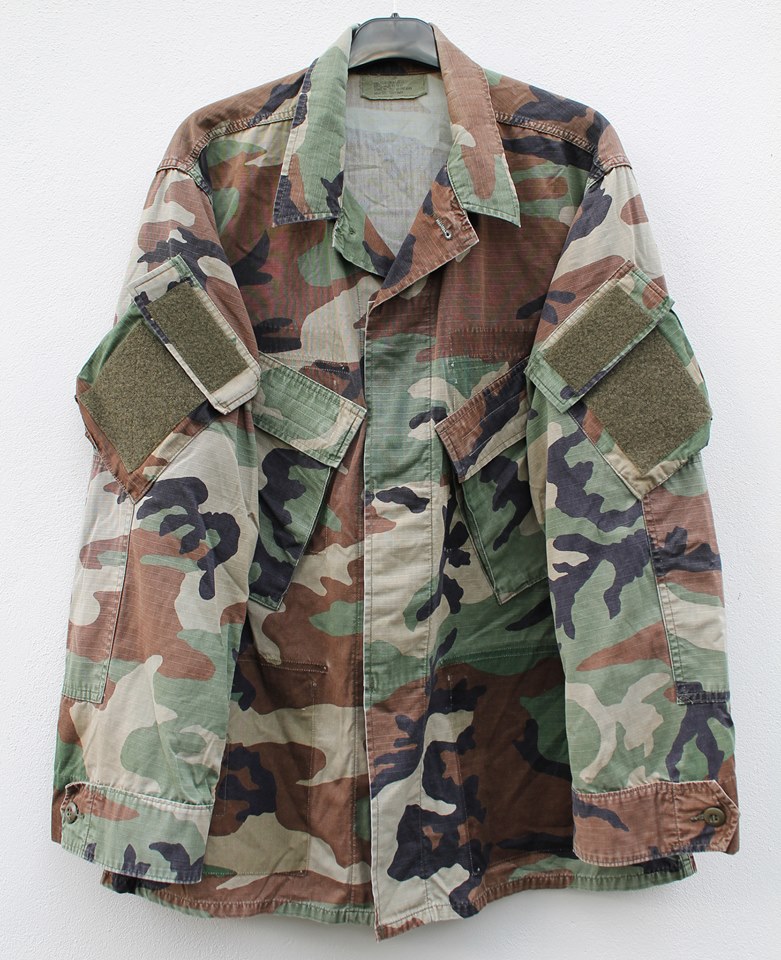
This is a RAID mod shirt in the true sense for me personally, as I bought it in standard BDU form then sent it off to a tailor and chose the specifics of the alterations myself, in the classic method.
For those unfamiliar, you can read my article on ITS Tactical where I touch on the topic of RAID modding for shirts and the history thereof, but the jist is that guys have been taking the pockets off the front of their uniforms and having them sewn on to the upper arms since at least WW2. Whether it was parachute harnesses back in the 40s or common body armour after that, there has been gear blocking access to torso mounted pockets for a long time, yet standard issue uniforms did not adapt, so having your shirt pockets on the sleeve instead of the torso just made sense. The practice ended within the US Army of course when they moved over from the BDU in Woodland/Tri-Color Desert over to the ACU in Universal Camouflage Pattern, since ACUs feature sleeve pockets as standard with the only torso pockets being on the chest and no more pockets on the lower abdomen.
My particular RAID shirt started life as a totally plain jane, 100% standard issue ‘Hot Weather’ coat in 50/50 NYCO Woodland, which originally had a US Air Force service designation tape sewn above one of the upper pockets. This was clearly someone’s barrack wear shirt for a long time as it was fairly thoroughly faded and broken in by the time I got hold of it. The pictures below demonstrate this pretty clearly in the areas where the sleeve cuff is tightened and the lack of sun bleaching of fabric where the lower pockets used to be.

The modifications undertaken include the following:
-Upper/chest pockets removed and relocated to the upper arms with a cant to allow easier access across the body. Closure method changed from buttons to velcro. Loop fields for patches added to the exterior of the pocket bodies and closure flaps, similar to Crye’s Army Custom cut.
-Lower/abdomen pockets removed and relocated to the chest. Placed at an angle to again allow easy access across the body, though I opted not to go for horizontal mounting as contents can too easily fall out when the flap is opened. Closure method is again velcro instead of buttons.
-The previously inaccessible storage area created by the double-layering of fabric on the elbows has been made accessible by the addition of slits with velcro closure at the top of each pocket. Padding can now be added to the elbow areas if desired.


The main closure down the front of the shirt is still the original buttons. I also didn’t opt for a ‘Mandarin’ collar by adding velcro to it, as I tend to find that simply fastening the very top button and popping up the collar provides plenty adequate neck protection from the sun and the rub of slings or shoulder straps. In service for barrack wear the BDU shirt was worn with the top folded/ironed open in a dress shirt style, much the same as CS95, but fastening all the buttons is certainly the superior method for most practical wear in the field.

While the individual who carried out work for me certainly did so to a high standard overall, they sadly are no longer in the business of tactical tailoring. Truth be told, even if they were, I would have to refrain from recommending them as multiple promised deadlines were missed and communication was extremely spotty at best. There was a point I was rather worried I’d not see my items again though luckily it did not come to that. It’s a shame that people who posses both the sewing skills and understanding of military uniforms necessary to create such pieces are like hens’ teeth these days, as this particular shirt is definitely one of the coolest looking in my possession. It may not be the most feature rich but it comes very close to a modern, commercial Field cut shirt in function and has an awful lot more character on account of the wear and custom modification.


Jonny
Great post! I’ve been wanting to do a RAID mod with my BDU top for a long time and I’m so glad I found this article because it’s given me something to reference when working with a tailor. I’m just curious as to what details/specs, measurements, pictures, or materials (velcro) did you provide to your tailor to ensure that they produced the exact product you were looking for?
TheFull9
Thank you. I used someone who was very familiar with and mostly worked on military apparel, so some rough guidance was all that was needed really.
John
Where did you get your loop Velcro